
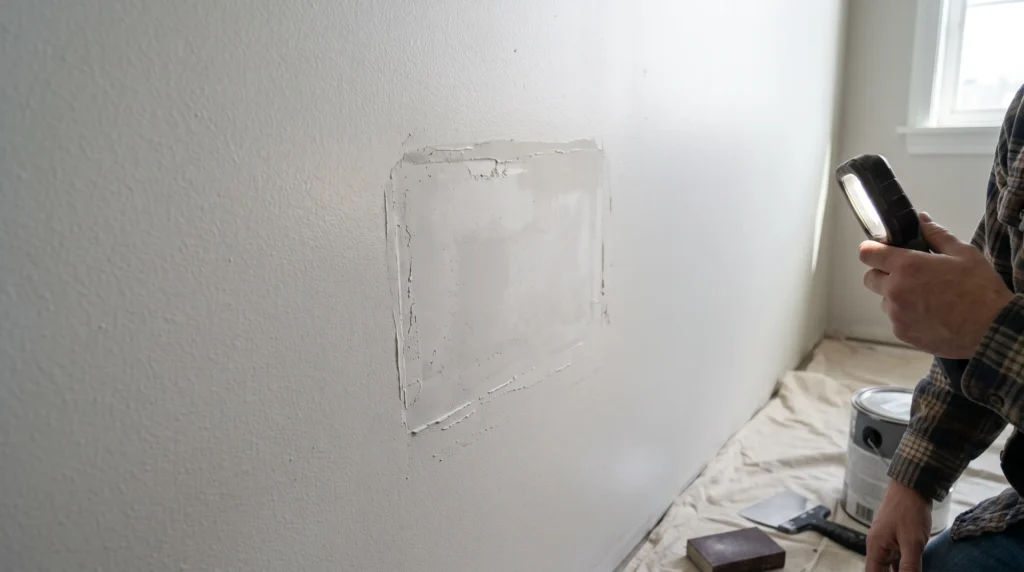
Drywall patches show through paint when the repair differs from the surrounding wall in texture, surface level, or paint absorption. To correct the problem, first identify whether you are seeing a raised edge, a texture mismatch, or uneven sheen. Another coat of the same color may leave the underlying issue visible.
At Brotherton Painting, we provide drywall repair, texture matching, and interior painting for Seattle homeowners. This guide explains how to assess a visible patch, prepare it for repainting, and decide whether to repaint the entire wall.
Why Are Drywall Patches Showing Through Paint?
Matching the paint color is only part of the repair. The patched area also needs to blend with the surrounding surface in profile, texture, and sheen, especially where light falls across the wall.
Fresh joint compound does not behave like a surrounding painted wall. Without suitable primer, it can absorb finish paint differently. Meanwhile, a smooth patch may contrast with existing roller texture, and an abrupt edge can leave a visible outline.
Before deciding how to fix visible drywall patches, inspect both the shape of the repair and the way it reflects light.
Paint Flashing or a Texture Difference?
Paint flashing can appear as uneven sheen or color caused by differences in absorption or surface texture. A patch with a different roller texture may also reflect light unevenly, so appearance alone does not tell you which correction is needed.
A texture mismatch is a physical difference between surfaces. A smooth patch on a textured wall may remain noticeable even after primer and paint. Raised ridges are another finishing problem that more paint will not flatten.
What you notice | What to investigate |
A dull or glossy spot | Uneven absorption or paint sheen |
A raised outline | Excess compound or insufficient feathering |
A smooth island on the wall | A texture mismatch |
A repair visible mainly from an angle | Small differences revealed by light |
This comparison helps narrow the problem; it does not establish the cause from appearance alone.
What Makes Drywall Patches Remain Visible?
Joint Compound Was Not Properly Primed
Joint compound absorbs paint differently from an existing painted surface. Skipping primer can leave the patched area with an uneven finish, making paint flashing more noticeable.
A dedicated primer helps balance absorption before the finish coat. However, primer cannot correct a raised patch or make two different textures match.
The Repair Has a Hard Edge
Drywall repair needs a gradual transition beyond the damaged area. When compound stops abruptly, the edge may catch light and reveal the outline.
A thick coat of joint compound can leave the drywall repair raised above the surrounding wall. As the compound dries, shrinkage may reveal imperfections that need another coat. Feather the repair beyond the damaged area, let it dry, and sand as needed to create a flat transition that will blend with the existing surface.
The Roller Texture Does Not Match
A patch can feel smooth and still look different from the rest of the wall. Existing roller texture needs attention alongside the underlying drywall repair.
Using the same roller nap as the original application can help match the finish, but it does not guarantee the same result. A different roller texture may remain visible after priming and repainting. Compare the surface texture of the repair with the rest of the wall before applying the finish coat.
How to Fix the Patched Area Before Repainting
Whether the drywall repair covers small holes or a larger damaged area, check that the patch is solid and the edges blend into the surrounding wall before applying finish paint. The goal is a consistent surface that is ready for primer and paint.
- Inspect under different light. A drywall patch may look fine straight on but remain visible when light falls across the wall. Check it from an angle for ridges, a texture difference, or a change in paint sheen.
- Correct the surface level. Sand raised areas as needed and feather joint compound beyond the immediate repair. Avoid leaving a hard edge around the damaged area.
- Allow the compound to dry. Let each coat of joint compound dry thoroughly before applying the next. Check for shrinkage and add another coat where necessary to create a gradual transition.
- Match the surface texture. Compare the repaired area with the surrounding wall. A smooth finish is appropriate only when it matches the existing wall.
- Remove sanding dust. Clean the repair before priming. Dust left on the surface can interfere with adhesion.
- Prime before painting. Use a dedicated primer appropriate for the patched drywall and follow the product instructions.
- Review before the finish coat. Once the primer is dry, check the edge, texture, and remaining imperfections. If further filling or sanding is needed, remove the dust and prime any newly exposed compound before applying finish paint.
For a ceiling or hallway wall, inspect from the positions where people normally see the surface. A patch that looks fine directly in front of you may remain obvious under angled light.
Will More Paint Help, or Should You Repaint the Whole Wall?
Adding more paint usually will not fix visible drywall patches caused by ridges, poor feathering, or texture mismatch. Those issues need correction first. Likewise, paint flashing associated with unprimed compound calls for attention to absorption.
After the drywall repair is properly finished and primed, the entire wall can be repainted to help achieve consistent sheen and roller texture. For an interior painting project, work from corner to corner rather than stopping around the patch. Repainting one wall does not automatically mean the whole room needs another coat of paint.
Repainting the full wall is therefore a finishing decision, not a substitute for preparation. Inspect the repair before committing to a broader repaint.
When to Ask for Professional Drywall Repair
Consider professional help when drywall patches remain noticeable after repeated attempts, several repairs show across one room, or you cannot determine whether the problem involves surface level, texture, paint absorption, or a combination of these factors.
If you need help with visible drywall patches in your Seattle home, contact our team at Brotherton Painting for an estimate. Tell us where the repair shows, what preparation has already been done, and which lighting makes it most noticeable. When reviewing the estimate, confirm whether it covers repair corrections, texture matching, priming, and a full-wall repaint.
FAQ
Will primer hide visible drywall patches?
Primer helps balance absorption and reduce flashing. It will not hide raised ridges, an abrupt edge, or a texture difference. Correct those issues before applying primer and paint.
Can flat paint solve the problem?
The answer depends on what makes the patch visible. Flat paint may make differences in sheen less noticeable, but it cannot flatten a raised drywall repair or match the surrounding wall texture. Fix those surface issues before changing the paint finish.
Why does a patch show only when sunlight hits it?
Strong side lighting from windows or surface-mounted fixtures, known as critical lighting, can make small differences in texture and finish more noticeable. Check the repair under different lighting before deciding what needs correction.
Should small patches be primed?
Yes. Small patches of exposed joint compound should be primed because they can absorb paint differently from the surrounding painted wall.